Learn to paint with oil paints. How to paint an oil painting: step-by-step master class
How to learn to paint with oil paints? Many aspiring artists strive to find the answer to this question. There is an opinion that canvases created using this technique are easy to execute, and the method of work itself is suitable for those who have just begun to get acquainted with painting. However, this attitude towards the paintings and the process itself distinguishes amateurs. Professionals know how difficult it is to create an oil painting.
Experienced masters have been studying the art of painting with oil paints for many years. Difficulties await beginners at every step: the process may seem too complicated to them, and numerous corrections will make those who are accustomed to quickly and easily achieving results nervous. But the opportunities that this wonderful technique opens up are worth the long learning curve. You can create beautiful and delicate sketches, sketches in pastel colors or an expressive and picturesque canvas. The play of colors and the play of glare will make your work a real masterpiece.
Many fans try to paint in oils visual arts, however, not everyone can master the method, which requires painstaking work and takes a lot of time from the young artist. But if you decide to start classes, be patient and be prepared for annoying mistakes. Remember: all the great masters went through the path of corrections and improvements, but none of them left their craft because of the difficulties that arose.
What should you do first? Buy paints. Choosing them is not an easy task for a beginner.
- It is believed that it is best to purchase a set of tubes;
- Don't be afraid that you won't have enough colors: take only those shades that you need to work on the painting;
- White and yellow paints run out very quickly: buy them in large tubes;
- Take 2-3 samples: this way you will provide yourself with the necessary supply of material for drawing.
Which products to choose
Many artists believe that premium quality paints work best on canvas for professionals. They are much more expensive than other samples presented in specialized stores, and are distinguished by bright colors and good consistency.
Getting started: what paints you need to purchase:
- whitewash;
- yellow;
- blue;
- natural umber;
- golden ocher;
- red dark or light cadmium;
- green;
- ultramarine;
- Neapolitan or Indian yellow
Brushes are essential tools for painting. How not to get lost in the existing variety of materials?
- many choose artificial samples: such products are durable and cope well with the effects of cleaning solvents and paint texture;
- Natural hair brushes are not suitable for oil painting and should be used for other techniques.
You also need to buy varnishes and special oil, which makes the paint more liquid and makes applying it to the canvas comfortable and easy. The base for the work should not absorb much moisture. Most often, products from the following materials are chosen for this painting technique:
- cotton;
- burlap (great for sketching);
- polyester.
Inspect the canvas carefully before purchasing it. Do not take a relief sample if threads stick out from it, or knots and bumps appear on the surface.
The materials have been purchased and you can safely get to work. How to start painting correctly with oil paints on paper and canvas? Should you mix different tones and use custom bases? Recommendations from professionals will help you believe in yourself and get closer to the skills of famous artists. Don't forget about daily training, and your paintings will become a unique work of art.
The first stage in the work of any painter: setting up the composition and drawing the contours of the depicted objects. Charcoal is best for applying the first touches to the canvas. The lines drawn by it can be easily erased with a rag. However, the sketch must be fixed: outlined with a pencil or graphite, covered with paint mixed with turpentine.
Write, don't paint. Do not choose the simple route of covering the canvas with one tone. Learn to mix paints and create subtle highlights. Remember about paired shades, the combination of which creates a new color.
- red + yellow = orange;
- red + blue = purple;
- blue + yellow = green;
- magenta + blue = dark and rich shade.
Don't be afraid to mix all the colors to see what the result will be. Aim for earthy and muted tones: these are the colors you'll need to create landscapes. Make shades lighter using white.
Draw by placing color spots on the canvas and working through them, comparing colors. Start with light areas. Establish relationships between muted and bright shades. Study the changing colors in nature. Without constant observation of the world around you, you will not notice subtle transitions and constant changes in the gamut that will need to be transferred to the picture.
Work "raw". When correcting mistakes, cover the area of the canvas with a new layer of paint. If cracks appear on the canvas, and the color fades and fades, cover the damaged areas with oil, remembering to remove the excess with sheet paper.
How to paint on hardboard with oil paints
Many artists choose non-standard bases for painting. One of the original materials is hardboard. It is a mixture of wood fibers and glue. Canvas made from such a hard board is especially heavy and durable.
Oil paints are ideal for painting on a similar basis. Before you start work, prepare the hardboard
- sand it with sandpaper to make it smooth;
- coat the surface with oil varnish;
- put several layers of water-based paint on the corrugated side;
- dry the canvas and prime it with white.
How to paint with acrylic and oil paints at the same time
One of the common painting techniques is the use of acrylic and oil paints, which are applied to the canvas in a certain sequence.
Oil is applied over acrylic. This base easily replaces the primer and protects the drawing well from damage. To create an expressive relief, you can add sand or small sawdust to the paint.
Painting is one of the main types of visual art. You can paint all your wildest fantasies on canvas. Anyone, even a novice artist, can immerse themselves in the world of oil paints. The main thing is to approach your work responsibly, and then the result will meet your expectations. An oil painting is an exclusive item that can be given as a holiday gift or hung in the house to decorate the interior of a room.
In contact with
Selection of materials
Oil painting lessons it's not worth saving. Cheap materials will ruin the impression of a novice artist’s work, even if it turns out the way the author intended.
The basis
 Traditionally little writing on canvas- stretchers covered with hemp or linen fabric. Stores provide a huge selection of canvases of all shapes and sizes. There are both rectangular and square ones. The basis should be chosen based on the plot of the intended work. If the author is going to depict a landscape, it is better to buy canvases from 30x40 cm, and if, for example, a still life, then you can choose a smaller size - from 20x30 cm. You should not take too large canvases, especially for the first oil paintings, since it is much easier to paint on them more difficult.
In addition, both fiberboard and special thick paper for paints are suitable for oil painting master classes.
Brushes
 There are different brushes: round, beveled, flat, for shading, and so on. It’s worth starting with the most common ones, which may be useful for your first work. Palette knives are also used in drawing, but you shouldn’t try your hand at working with them yet.
The choice of brushes must be approached responsibly, since low-quality brushes are not only inconvenient to use, but also spoil the painting. The fact is that hairs in cheap brushes can fall out during a lesson or master class in painting. And if the paint dries, it will be difficult to remove them. This will spoil a lot appearance work, since hairs dried with oil will be visible upon close examination. A low-quality brushes may crumble in large quantities.
Beginners don't have to immediately buy all the materials they need for art lessons, as some of them may not even be useful. Different shapes and bristles of brushes used to depict various objects. For example, one is chosen for landscapes, and completely different for portraits. First you need to purchase several regular flat brushes of different sizes or a set of 4-5 brushes.
Oil
 Oil paints Sold in sets and individually in tubes. This is convenient, since the artist can choose the individual colors that he will need in a painting lesson to depict a particular subject. Manufacturers focus on natural shades. Art stores provide a choice of several shades of yellow, white and other colors, which only an experienced craftsman can figure out.
Before you paint with oil paints, you need to make sure that all the necessary shades of paint are on the table. As a rule, the following are used in the first painting lessons:
- titanium white (manufacturer “Gamma” or “Master Class”). This paint is used the most. You should take two tubes at once;
- cadmium yellow medium (manufacturer “Master Class”). Often used for landscape paintings and still lifes;
- durable red kraplak (manufacturer “Master Class”);
- cadmium red dark (manufacturer “Master Class”);
- mars brown dark transparent (you can take paint from any manufacturer “Gamma”, “Ladoga”, “Master Class” and others);
- blue FC (manufacturer “Master Class”);
- light ultramarine (manufacturer “Master Class”);
- yellow ocher (from any manufacturer). It must be there, since there are a lot of ocher shades in painting. If necessary, they can replace any other color by mixing with other natural shades;
- English red (from any manufacturer). Used as often as yellow ocher;
- lemon cadmium (manufacturer “Master Class”);
- herbal green (any manufacturer, preferably “Ladoga” or “Master Class”);
- emerald (manufacturer “Master Class”);
- cadmium orange (manufacturer “Master Class”);
- cobalt blue spectral (manufacturer "Master Class");
- sky blue (manufacturer "Ladoga");
- turquoise (manufacturer "Ladoga");
- natural umber from Leningrad (any manufacturer). Replaces black paint, but looks more natural.
Must choose materials from well-known manufacturers. In no case should you skimp on oil, just like on brushes. The Master Class company uses natural dyes , so in most cases it is better to take this particular oil. Other series also deserve attention; it is worth paying attention to the specific color.
It is important to pay attention to the stars painted on tubes of oil paints. They signify stability. There should be two to three stars. You shouldn’t take one: they are intended for sketches and student work. A painting painted with one-star paints will fade very quickly from exposure to ultraviolet radiation.
Solvents, varnishes and vegetable oils
Painting uses solvents and natural vegetable oils. They are mixed with paint to change its texture. It is necessary to purchase the “Tee” thinner - it is universal and ideal for beginners. As for oils, flaxseed is usually used. To give your work a finished look, you should buy varnish. An ordinary damar one will do, although there are a huge variety of them.
Preparation of the workplace
 The place where the artist will paint must be well ventilated and lit. As a last resort, you need to choose a bright lamp, securing it at your workplace.
Preferably use an easel to paint. But if it is not possible to purchase it or make it yourself, you can put up an ordinary wooden chair, laying an old newspaper or paper on it.
The artist must change into unnecessary clothes, because the oil is difficult to wash off. Hair should be pulled back into a ponytail and not interfere with the painting.
Choosing the subject of a future painting
The plot of the future work is chosen based on the capabilities and wishes of the author. There are several options for beginners:
- scenery;
- portrait;
- still life.
The portrait can be considered the most difficult of all of the above. To work on landscapes and still lifes, you need to understand the laws of perspective and light and shade. You should try your hand at depicting a traditional bowl of fruit or a classic meadow. These topics are very common among inexperienced artists, since painting lessons should start with the simplest and lead to more complex ones. It’s not worth taking the most complex plots, because the result will not be what was originally planned.
Master class on working in oil on canvas
Understanding how to paint with oils is not difficult. In progress accuracy and patience are important, because paint is not very easy to work with.
The plan for working with oil paintings is as follows:
- you should decide on the topic of the work, and then select the source, that is, a painting by another author for sketching. You can also try drawing from scratch;
- then the image is transferred to the canvas. This must be done using the usual a simple pencil. You need to draw carefully, since it is more difficult to erase pencil lines from fabric than from paper. But the illustration should be clear and bright: the lines should be clearly visible under a layer of oil paint;
- Afterwards, colors and their shades are selected, diluent and oils are prepared. It’s worth setting up your workplace in advance;
- Oil painting involves applying paint in brush strokes. You need to start reading from the main fragments. You need to work with a brush confidently, not to forget about light, shadow and small details that may not be visible under a thick oil layer;
- Afterwards, you need to leave the work in a ventilated area to allow the oil to dry. After some time, for example, a month, you can coat it with varnish.
It is necessary to use oil paint solvents carefully and avoid contact with eyes and skin. Dyes are very caustic, so if they get on fabric, wallpaper or floors, they may not wash off.
Have you ever dreamed of painting a beautiful, expressive oil painting? In this article you will find some tips to help you dive into beautiful world oil paints. Once you master the basics of working with oil paints, canvas will become your world of fantasy!
Steps
Part 1
Beginning of work-
First, make a pencil sketch of the future painting on canvas. This will help you build a composition, small details, straight lines and so on. Once you have made a sketch, you can easily make changes to it. First - a pencil sketch, and then - painting with paints (of course, if you do not plan to draw something abstractly random). Don't forget about composition and negative space.
- Composition is the position of objects in a drawing. The composition should be such that the eye is drawn to the whole drawing, and not just some part of it.
- Negative space, in turn, is the space around the object in the drawing. If, say, you are sketching some real object, then you can draw complex places without any problems if you look not at the object itself, but at the space around it. Think about how you will fill the negative space in the drawing so that the object still stands out and is not lost against the background.
- Consider intersecting and overlapping shapes, and use them to add depth to your drawing. If the composition is such that nothing intersects anywhere, then it’s time to change the composition. Depth will make your drawing more realistic.
-
Find a light source. To make the drawing realistic, you cannot do without depicting the darkened and illuminated areas in the picture. Look at the object and think about the angle at which the light falls on it, where the shadow, penumbra and highlight will be located.
- If there is a light source, then there will be a shadow - a fact. However, if the light comes from above, the shadow may be difficult to notice. Try moving the light source or the subject itself to make the shadowed and lit areas more apparent.
- Perhaps you will not have a darkness that is darker than twilight and a radiance that is brighter than the dawn. Well, most likely, your shadow and non-shadow will differ in strength by a semitone-tone. If your light source does not provide a clear light-shadow boundary, then do not worry. This is fine.
-
Choose colors. For beginners, it can sometimes be very difficult to match the color of an object with the color of a paint (especially when paints must be mixed to obtain the desired color). This is because the brain “sees” colors in a rather idealized way - you might start mixing paint to paint a blue sky, and then realize that your paint is much brighter and bluer than necessary. How to deal with this? Try to step away from the symbols your brain uses and explore the actual colors you use. This will change the brightness of your colors.
- An object painted at night will be darker and more saturated in color. An object photographed during the day will be brighter.
- Check the color of the light source. On a bright sunny day, your subject should be golden yellow. On a cloudy day, therefore, the light scattered through the clouds will paint the object a grayish color. Light can even be colored - neon lamps are an example of this, and this will also change the color of the object.
-
Look at the movement of the object. By the way, is your sketched object moving? Or does it move, and how? Maybe not only the object itself is moving, but everything around it? Take this movement into account; it will be useful at the planning stage of further brush work. In realistic-looking paintings, brush strokes convey movement (though the opposite is also true).
- Take advantage color scheme to make it easier to mix colors. Using gamut, you'll see primary, secondary, and tertiary colors and understand how to make them.
- Pure colors are those that have not been mixed with either white or black. When primary colors are mixed, secondary colors are obtained.
- Light colors are obtained by adding white to the color.
- The shadow, accordingly, is obtained by adding black.
- To tone, add white to the shadow (color + black). Tones are used very widely, they depict most colors from, so to speak, everyday life.
-
Start drawing. You can draw in any way and technique convenient for you, even by drawing in parts, at least in layers, at least in whatever way. However, since you are working with oil paint, it is worth remembering the great rule: thick on thin. In other words, you first need to paint with diluted, liquid paints, and only then over them with thick ones.
- Try drawing simple objects. All figures consist of several simple shapes: cube, cone, cylinder and ring. Draw them first as real objects (say a box of oranges) or as flat shapes of themselves.
- How to make paint less thick? Take turpentine or linseed oil, mix it with paint and, in general, that's all. Add thinning agent in small doses, little by little, to get exactly the consistency you need.
- It will take three days for the paint layer to dry enough to allow a second coat to be painted on, so take your time and let the paint dry.
-
Try different drawing techniques. There are dozens of such techniques, but if you, a beginner, start learning them all, your head will spin very quickly. You'd better choose a couple of techniques and focus on them.
- To help oil paints dry faster, store them in a well-lit, dry, and warm room. In addition, when choosing paints, give preference to those that dry faster.
-
Cover the picture with varnish. When the paint is completely dry, you need to protect it, and for this you will need varnish. With varnish you will also protect the colors from fading (to one degree or another). When the varnish is dry, you can congratulate yourself - your picture is ready, hang it somewhere in a visible place!
EXPERT ADVICE
Kelly Medford is an American artist living in Rome, Italy. She studied classical painting, drawing and graphics in the USA and Italy. He works mainly plein air on the streets of Rome, and also makes trips for private collectors. She is the creator of art tours of Rome, Sketching Rome Tours, during which she teaches guests of the Eternal City how to create travel sketches.
Artist working plein air
The painting should be varnished only after the paint has dried - not before. Kelly Medford, a plein air artist, says: “ Different kinds paints are drying different time- this determines when they should be varnished. Oil paints drying top down, and it can take six months to a year before the paint dries and you can protect it with varnish. Varnish does not allow the paint to breathe and prevents final drying, so if you apply it too early, the painting can simply be ruined.”
- Black Ivory takes a very long time to dry - try not to use it for background coverings.
- Do not use linseed oil to dilute light paints - they will quickly turn yellow.
- To remove oil paints from your hands, use baby oil or olive oil. Apply a little oil to a rag or napkin and wipe your hands with it. Do not wash your hands until you have scrubbed off the paint, otherwise this method will be useless. Oil paint comes off easily if you knock the wedge out with a wedge - another oil. Once you have rubbed the paint off your hands, wash them with soap and water.
- To prevent your paint palette from drying out, place it in water or put it in the refrigerator.
- Do not put the palette in water for too long, otherwise it will become oily from the paint.
- To avoid getting your hands dirty, wear latex gloves.
- Before using new paint, rinse your brush thoroughly in warm water.
- To make the image three-dimensional, make strokes around the object. For example, if you are drawing a floor, use horizontal strokes.
Choose paints. You understand, before you paint a picture in oil, you need to purchase oil paints. Of course, the choice of paints these days is more than wide, but you should not buy cheap paints. Yes, you'll save money, but cheap paints tend to be of sub-par quality, which can make your art experience...less than pleasant. Spend more money, but buy one jar of quality paints, not 2-3 cheap ones.
Stock up on everything else. Beginning artists often succumb to the demon of saving and do not buy what they need. In principle, this is not as bad as it seems, but there are some things without which oil painting will not be such a pleasant and simple experience!
Prepare your work area. Since you will need a lot of things to draw, almost all at once, you need a lot of space. The easel or table should be placed where no one will disturb you. It is advisable, among other things, to work in a place well lit by natural light. It would also be a good idea to put something like a blanket on the floor so as not to stain the floor with drops of paint.
Part 2
Drawing evaluationPart 3
Creating a MasterpieceMix the colors. In this sense, oil paints are ready to “forgive” almost any mistakes - they dry very slowly. However, it is worth remembering that mixing two paints into the same color twice is almost impossible. What lesson can be learned from this? That’s right, you need to mix paints “in bulk”, with a reserve, so that you have something to paint the next day.
Part 4
Final touchesCorrect all errors. You'll have about three days while the paints are still wet, during which time you can both correct mistakes and wipe them off completely with a damp cloth. Please note that there is no need to rush to declare the drawing ready - first you need to critically evaluate it and think about whether something can be improved.
Save the remaining paint. If you mixed so much paint that you didn't need most of it, save it for next time. Place the paint in small containers and cover them with cling film.
Clean your brushes. If oil paint dries on your brush, it will be easier to throw away the brush, so don't put off cleaning your brushes for too long. Take turpentine, an old rag and go ahead - scrub the paint and rinse the brush under running water until it flows from the brush and becomes transparent. Then check the bristles with your hand to make sure that all the paint has been washed out. Place your clean brushes in the jar - bristles up, not down! Make sure there is normal air circulation in the room where the brushes are drying. It's best to simply place the jar of brushes in an open place, say on a shelf or table, rather than in a cabinet or desk drawer.
Wait. When will oil paint dry completely? This can take up to 3 months, or even more if the painting consists of many layers of paint. Place your creation where it will not be disturbed and let the air do its drying work.
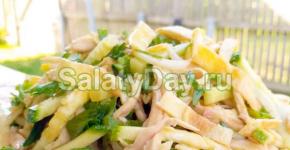
Good afternoon My name is Anastasia, I am an artist. My master class on painting with pastels was already in the community, and now the opportunity has come to show another technique, painting with oil paints.
A friend approached me with a desire to make a small painting by Camille Corot as a gift to her mother. My friend is not an artist; she once studied at an art school as a child, but that was a long time ago. As an artist, it seems to me that drawing is easy, and I was confident that the picture would turn out well. I provided all the art materials and only gave hints. This is what we got. In my opinion, not bad for a beginner!
Perhaps, walking through the museum more than once, you wondered how all these beautiful old paintings were painted, looking at the brush strokes and finely made details. And probably any beginner can try to make a copy of their favorite painting. After all, earlier, copying drawings and paintings of old masters was one of the main artistic subjects educational institution. Often I see that novice draftsmen copy some modern pictures from the Internet that have no artistic value. And observing and repeating the old masters cultivates the taste and eye of the beginner and will bring much more benefit.
Today I propose to look at how we worked. Maybe someone will learn something new. Let's call our task "Free copy" of a painting by Camille Corot. Free copy, because we removed the images of the figures, because for a novice draftsman, this detail may seem difficult and because, of course, this is not a copy in the full sense of the word!

We will need:
1. Thinner
2. Linseed oil (compacted preferably) If the oil is compacted, it will act like varnish and the paint will dry faster.
3. Brushes: Column, Synthetic, you can take squirrel, but it is too soft.
4. Palette.
5. Stretcher with canvas. Fine grain canvas.
6. Oil paints. I am listing an approximate palette that is suitable for copies.
Titanium white
Light ocher
Natural sienna
Olive green
Ultramarine
Burnt bone
Mars brown light or Van Dyck or natural umber
Red ocher
7. Palette knife or blade. (Not necessary)
8. Mushtable or any other stick. What it is needed for is shown in the photo below. For small work, to make your hand more confident, it is convenient to lean on the mast
And so, the workplace should be comfortable. You can print the picture that you will copy, or you can work from the monitor. It’s more convenient on a monitor because you can enlarge any detail.

You can choose any picture, we needed exactly this work. It is even more interesting to take the work that you can see in a local museum, because when looking at the painting in real life you will see many little things that are not visible in the picture. 
How to translate a drawing:
1 way. Draw on the canvas as you see. Just not with a graphite pencil, preferably a pastel one. Graphite can then migrate through the paint.
Method 2. Print the picture in the desired size. On the back side of the sheet, shade the surface with dark pastel, sauce, and rub with a cotton swab. Or you can take oil paint and not very thickly, paint over the sheet. It turns out to be a carbon copy. Translate the drawing, the main lines of the branches, the volumes of foliage, you don’t need to translate every leaf and pebble, it will still be painted over.
1.
Once the drawing is translated, you can outline it with watercolors.
2.

We do imprimatura. The old masters did not work on white canvases. If you're in a museum, pay attention to the paintings; you can often see the lining there. In different schools of painting, the color of the imprimature was different. For example, the Dutch have a reddish one, Rubens has an olive one, and some have a brownish one. In our picture we decided to make a neutral olive color.
Take light ocher + whitewash + burnt bone, you can add a little olive.
3. Feel free to apply a layer of paint. The drawing should be readable

4. When the imprimatura is applied, wait for it to dry. Our canvas took about 5 days to dry. We need to be patient.

5. Basic colors on the palette. We dilute the thinner with linseed oil 1:1 in an oil dish.

6. We start working from dark areas.

7.Gradually we gain a lot of foliage.

8. outline the background.

9. enter the color of the sky.

10. Lay the tone of the grass in the foreground.

11. We look at the picture as a whole, without details, as shown in the blurry photograph and try to repeat it. The more accurately you repeat the tonal spots, the better the work will be. 
12. When the basic tonal relationships are laid down, you can carefully work out the details, branches, gaps in foliage, grass...

13. don’t forget about the drill! Without it, your hand may smudge your painting.

14. If there are particles of paint or hairs from a brush in the picture, then they can be carefully removed with a blade or palette knife.

15. We continue to make details.

16. We decided to finish the work at this stage. We did it in two sessions, 4 hours each. Not including time for imprimatura and translation of the drawing.

17. Tip for keeping your brushes in good shape)))
- If you work with polish or synthetics, it is convenient to wash your brushes in thinner and then dip them in machine oil. Only it’s machine-made, it doesn’t dry out and the brushes will keep their original shape.
- For other brushes there is a good old-fashioned method. Wash with laundry soap and wrap in newspaper. The brushes will always maintain an even blade shape.

Thank you for working with us! And good luck to you!